
Main Courses
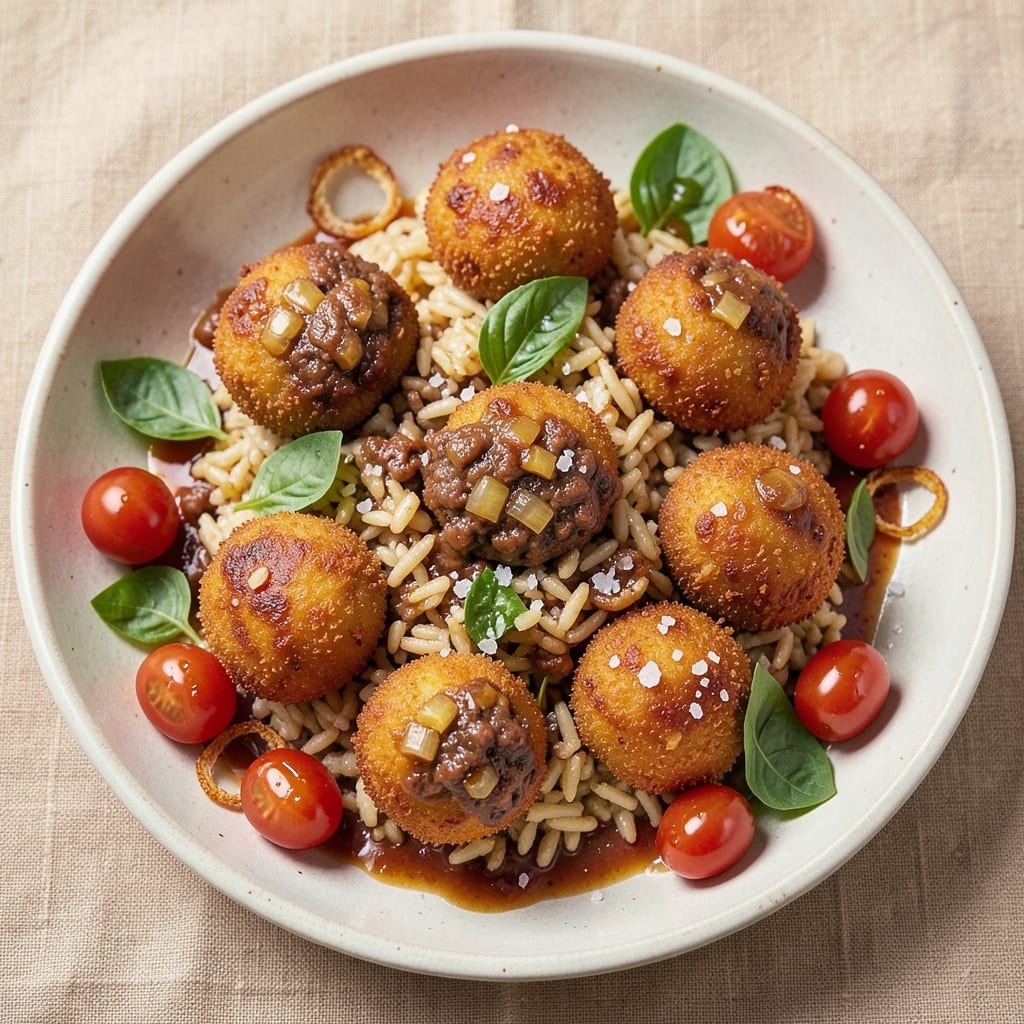
This arancini rice recipe delivers crispy golden bites with melty mozzarella hearts at the center—just like Sicily’s best trattorias. The secret lies in perfectly cooked Arborio rice, folded with ragù and mozzarella, then breaded and fried to a crispy exterior that shatters with every bite. I’ve perfected this technique over years of testing, ensuring the filling stays intact while the coating achieves that coveted crunch.
The process begins with a flavorful risotto base—Arborio rice simmered in broth until al dente, then mixed with slow-cooked ragù and fresh mozzarella pearls. This filling is shaped into balls, rolled in breadcrumbs, and fried in hot oil until golden brown. The result? A dish that’s equal parts satisfying and impressive, with a texture that’s crispy outside and creamy inside.
What makes these arancini truly special is the balance of techniques: the rice must be cooked just right to avoid mushiness, the mozzarella should melt without leaking, and the frying temperature must be precise to achieve that crispy shell. Serve them as an appetizer, a side, or even a main course with a sprinkle of parsley and a squeeze of lemon.
For those who prefer vegetarian options, swap the ragù for mushrooms or roasted vegetables while keeping the mozzarella for that signature melt. The classic version, however, remains a timeless favorite—rich, crispy, and impossible to resist. Let’s get started on making these golden bites!
Ingredients for arancini rice
Perfectly cooked Arborio rice, rich ragù, and melty mozzarella create these crispy Sicilian bites.
| Ingredient | Amount | Notes |
|---|---|---|
| Arborio Rice 🍚 | 1 cup | Uncooked, short-grain preferred |
| Yellow Onion 🧅 | 1 medium | Diced finely for filling |
| Garlic Cloves 🧄 | 4 cloves | Minced for ragù base |
| Ground Beef 🥩 | ½ lb | 80% lean for rich flavor |
| Canned Crushed Tomatoes 🍅 | 1 can | San Marzano preferred |
| Vegetable Broth 💧 | 3 cups | Low-sodium for flavor control |
| Fresh Mozzarella 🧀 | 8 oz | Pearls or torn chunks |
| Large Eggs 🥚 | 2 whole | Beaten for breading |
| Plain Breadcrumbs 🍞 | 1 ½ cups | Panko for extra crunch |
| All-Purpose Flour 🌾 | ½ cup | For dredging |
| Vegetable Oil 🫒 | 3 cups | For frying, 350°F |
| Salt 🧂 | 1 ½ tsp | Kosher or sea salt |
| Black Pepper 🌶️ | ½ tsp | Freshly ground |
| Dried Parsley 🌿 | 1 tbsp | For garnish |
| Lemon Juice 🍋 | 1 tbsp | Freshly squeezed |
The Arborio rice is non-negotiable—its high starch content is what makes these arancini hold their shape. Riso Gallo or Barilla are my go-tos, but any Arborio will work. For the mozzarella, fresh pearls are ideal, but torn chunks from a block work too—just squeeze out excess moisture first. The ground beef should be 80% lean for the best texture, and pre-diced onions save time. If you're short on time, pre-minced garlic from a jar works fine, though fresh has more punch. The vegetable broth needs to be low-sodium—you'll be adding plenty of salt later.
No Arborio rice? Carnaroli is the next best thing, though it's pricier. Swapping beef for mushrooms? Cremini or shiitake hold up well to the frying process. The breadcrumbs can be seasoned if you prefer, but plain gives you more control over flavor. For a lighter version, use almond flour or crushed cornflakes instead of breadcrumbs. The vegetable oil should be refined to avoid strong flavors—Crisco or vegetable oil from the grocery store works perfectly. If you're making these ahead, undercook the rice slightly—it'll finish cooking during frying.
Store the cooked arancini in an airtight container lined with paper towels to absorb excess oil—they'll stay crispy for 2 days. For longer storage, freeze them unfried in a single layer, then fry straight from frozen. They reheat beautifully in the oven at 375°F for 10 minutes. These make fantastic appetizers—double the batch and freeze half for next time. The lemon juice is optional but brightens the dish beautifully, especially if you're serving them as a light meal.
Why You'll Love This Recipe
- One-Pot Wonder: I swear by this—no chopping mountains of veggies, no fancy techniques. Just brown the beef with onion and garlic, stir in the tomatoes, then toss in Arborio rice and water. The rice soaks up all the flavor while you’re still deciding what to watch on TV.
- Craving-Worthy Crunch: That crispy breadcrumb shell? Chef’s kiss. The secret’s in toasting the panko just right—golden and shatter-y—while the inside stays pillowy from the Arborio’s natural starch. Honestly, I’ve had people ask for seconds before the plate even hits the table.
- Game for Any Night: Weeknight dinner? Check. Potluck side? Done. Even my picky teen uncle devours these. They’re hearty enough to stand alone but pair perfectly with a simple salad or marinara. (Yes, even on a Tuesday night.)
- Budget Meal, Big Payoff: Ground beef and canned tomatoes stretch into a feast, and Arborio rice is cheaper than you’d think. I make a double batch—freeze half for lazy days—and still have leftovers that taste just as good reheated. My wallet and my taste buds thank me.
Step-by-step instructions for arancini rice balls
Master the art of golden, crispy arancini with this foolproof method.
Cook the Ragù Filling
Heat a large skillet over medium heat and add the 0.5 lb ground beef. Cook until browned, breaking it into small pieces with a wooden spoon. This should take about 5-7 minutes. Drain any excess fat, leaving just enough to coat the pan.
Add the 1 medium yellow onion and 4 cloves garlic, cooking for 3-4 minutes until softened. Stir in the 1 can crushed tomatoes and 3 cups vegetable broth, then bring to a simmer. Reduce heat to low and let it cook for 15-20 minutes, stirring occasionally, until the mixture thickens slightly. Season with 1.5 tsp salt and 0.5 tsp black pepper. Remove from heat and let cool completely before using.
Prepare the Rice Mixture
In a large bowl, combine the 1 cup Arborio rice with the cooled ragù mixture. Stir in the 8 oz fresh mozzarella, breaking it into small chunks if using pearls. The mozzarella should melt slightly from the heat of the ragù, creating a creamy, stretchy filling. Add 1 tbsp lemon juice and mix gently but thoroughly. Let the mixture cool completely before shaping.
Here's the thing—this filling needs to be cool enough to handle but warm enough to stay cohesive when forming balls. If it's too warm, the mozzarella will melt completely and make shaping difficult. If it's too cool, the rice will be stiff and crumbly. Aim for a temperature where it's just barely warm to the touch.
Shape and Bread the Arancini
Wet your hands with water to prevent sticking, then take about 2 tablespoons of the rice mixture and roll it into a ball between your palms. Gently press a small mozzarella pearl into the center of each ball to create that classic cheesy surprise. Place the shaped arancini on a plate and refrigerate for 15 minutes to firm up.
Set up three shallow bowls: one with the 0.5 cup all-purpose flour, one with the 2 beaten large eggs, and one with the 1.5 cups plain breadcrumbs. Roll each chilled arancini first in flour, then in egg, and finally in breadcrumbs, pressing gently to adhere. This triple-layer breading ensures maximum crispiness. Let the breaded arancini rest for 10 minutes before frying.
Fry to Golden Perfection
Heat 3 cups vegetable oil in a deep fryer or heavy pot to 350°F. Use a deep-fry thermometer to monitor the temperature—it's crucial for even cooking. Fry the arancini in batches, turning occasionally, for 3-4 minutes until they're deep golden brown and crispy on all sides. Be careful not to overcrowd the pot, as this will lower the oil temperature and result in greasy arancini.
The key to crispy arancini is maintaining the oil temperature. If the oil starts smoking or the arancini brown too quickly, reduce the heat slightly. Once fried, transfer them to a paper towel-lined plate to drain excess oil. Sprinkle immediately with 1 tbsp dried parsley for a pop of color and freshness.
Serve Warm and Enjoy
Serve the arancini immediately while still warm and crispy. The contrast of the golden, crunchy exterior with the creamy, cheesy interior is what makes these bites so irresistible. Pair them with a simple marinara sauce for dipping, or serve as a standalone appetizer for your next gathering.
Real talk: these arancini are best enjoyed fresh out of the fryer. The crispiness fades quickly, so don't make them ahead of time unless you're reheating in the oven at 350°F for 5-10 minutes to restore the crunch. Each bite should deliver that perfect balance of textures and flavors—crispy, cheesy, and savory all in one.
Pro Tips For Making Arancini Rice
- TOAST THE ONIONS FIRST: I used to toss raw onions into the beef and end up with a bland, watery filling. Instead, cook the diced yellow onion in olive oil over medium-high heat until it’s deep golden—almost caramelized—before adding anything else. That sweet, concentrated flavor carries through the whole dish.
- SALT THE RICE WATER: Skip the "just add salt at the end" habit. Toss the Arborio rice in 1 teaspoon of salt before toasting it in the pan, then add another 1.5 teaspoons to the simmering broth. The rice absorbs flavor better this way, and you won’t end up with bland, mushy centers.
- DON’T OVERMIX THE FILLING: I learned this the hard way—packing the beef, tomato, and rice too tightly into the arancini makes them dense and greasy. Keep the filling loose and slightly uneven; it’ll hold together when fried, and the texture stays light. Press gently, but leave room for expansion.
- FREEZE HALF THE DOUGH: Making a big batch? Shape your arancini, then freeze half on a tray before frying. No extra effort—just pop them straight from the freezer into hot oil. They’ll crisp up just like fresh ones, and you’ll save hours of last-minute prep. (Yes, even if you’re impatient like me.)
Make-ahead tips for this dish
Prep Ahead Strategy
Shape the arancini filling 24 hours ahead and store them in an airtight container lined with parchment paper. Keep them refrigerated until ready to bread and fry—this prevents the rice from drying out. I always prep the filling first, then shape the balls when I have time, making the final assembly a breeze. 💡
Freezing Unfried Arancini
Freeze uncooked, breaded arancini on a tray lined with parchment paper for 1 hour to prevent sticking. Transfer them to a ziplock bag with a paper towel to absorb moisture, then freeze for up to 3 months. Fry straight from frozen—no thawing needed! Just add 30 seconds to the frying time to ensure they’re crispy. ✨
Oven Reheating Hack
For crispy reheats, place fried arancini on a baking sheet and broil for 2-3 minutes at 400°F. This restores the crunch without making them soggy. I use this trick when serving leftovers—it’s a game-changer for parties where timing matters. 🔥
Batch Frying Tips
Fry in small batches (no more than 6 arancini at a time) to maintain oil temperature. Use a slotted spoon to transfer them to a paper towel-lined wire rack—this keeps them crispy longer than a plate. Overcrowding drops the oil temp, leading to greasy results. Trust me, patience here pays off! 💪
Make-Ahead Sauce
Prep your marinara sauce in advance and store it in a sealed jar in the fridge for up to 5 days. Reheat gently on the stove before serving—it pairs perfectly with freshly fried arancini. I like to add a pinch of red pepper flakes for a spicy kick when reheating. 🌶️
Garnish Last Minute
Skip the parsley until serving—it wilts if added too early. A quick sprinkle of fresh parsley and a squeeze of lemon juice right before eating keeps the flavors vibrant. This final touch makes all the difference for a restaurant-quality finish. 💛
Nutrition facts
Frequently asked questions
Can I make arancini without frying them?
For a lighter version, bake them at 400°F for 20-25 minutes on a parchment-lined tray, flipping halfway. Brush with olive oil first for extra crispiness. The texture will be different—more like a breaded rice ball—but still delicious.
Why did my arancini fall apart when frying?
This usually happens when the rice filling is too wet or the balls aren't chilled enough before breading. Let the shaped arancini rest in the fridge for 15 minutes to firm up, and make sure your rice mixture isn't soupy. A good rule: if it sticks to your fingers when shaping, it needs more time to cool.
What's the best way to store leftover arancini?
Keep them in an airtight container lined with paper towels to absorb moisture—they'll stay crispy for 2 days at room temperature. For longer storage, freeze uncooked breaded balls for up to 3 months. Fry straight from frozen, adding 30 seconds to the cooking time.
Can I use different types of cheese?
While fresh mozzarella is traditional, you can experiment! Try fontina for a nuttier flavor or provolone for extra richness. For a vegetarian option, swap the meat ragù for sautéed mushrooms or roasted butternut squash. Just ensure the cheese melts well—avoid hard cheeses like parmesan.
How do I keep the mozzarella from leaking during frying?
Use fresh mozzarella pearls (not shredded) and squeeze out excess moisture before mixing. Chill the filled arancini for 15 minutes before breading—this helps the cheese set slightly. If you notice leaks during frying, your oil may be too hot—keep it at 350°F for perfect results.